Pages

7.29.2007

Dare to Get Dirty Easy Elegance

Here is a card that I made for one of the Dare to Get Dirty challenges over on Splitcoast. This is for the Easy Elegance challenge given by NoTimeToStamp (don't you just love her name?).

I don't know what is more elegant than Fabriano Mediovalis folded reply cards. After all, her Royal Rubberness herself recommends these...and she is absolutely 100% dead on in her recommendation. These feel elegant to the touch. Other things that I think make this an elegant card? The color purple. Purple is the color of royalty and is my absolute favorite color. I also think that all of the beautiful white space and no layers make this card simply elegant. The only thing that I would have done differently, would have been to use a satin or silk ribbon. Guess I need to go shopping. :-)

The technique I used is watercolor stamping. I thoroughly misted the front of this card with water and let the water soak in while I inked up my stamp. I used my SU markers in Old Olive, Lavender Lace, and Elegant Eggplant to ink up the solid image from Petal Prints. I then just stamped the image twice without reinking. I then used my heat gun to speed up the drying process. Once dry, I overstamped the outline image with Versamark and then sprinkled with Ultra Thick Embossing Powder. This gave the impression of dew drops. I then applied a little crystal stickles in a few strategic places for a little extra touch. The Olive organdy was heated with my heat gun also to ruffle it a little.

7.28.2007

Dare to Get Dirty Flourished Floral


Here is another card that I made for one of the Dare to Get Dirty challenges over on Splitcoast. This is for Genie1314's sketch from the first day.

This card was so easy...it almost felt like cheating while I was making it. I had an awesome sketch to work with and then I had an awesome new find to play with. That find being Penny Black stickers. The floral image, the striped piece on the bottom, and the long white flourished piece on the side is all a sticker. I'm going to have to go back and acquire a few more.

Archivers has beautiful shimmery colored cardstock (like SU's shimmery white, except colored). The colors used for this card are Antique Gold, Bronze Jewel, and Ruby Jewel. Does anyone know where one can purchase packs of this stuff? The company who makes it is 'The Paper Company'. I also used SU Rose Red for some of the panels to brighten things up. The sticker images are finished off with some Crystal and Goldenrod stickles for a little shimmer. A beautiful aged copper decorative brad finishes of the card.

Dare to Get Dirty Wanted


This is another card that I made for the Dare to Get Dirty challenges over on Splitcoast. This is another multi-tasking card...a necessity in my house (I say this as I hear my oldest son yelling MOM...come downstairs). This combines Julia's sketch challenge and TexasJodyLynn's brad challenge.

The card is 5 1/2 square and is hinged on the left side. I used a bunch of aged copper brads. I tend to hoard all my embellishments and this card really felt good to make. Brads AND designer paper all on one card. LOL!

Card uses the new SU Wanted set and the Outlaw designer series paper. Some edges of the designer paper are roughed up and sponged with Chocolate Chip classic ink. The Horse, Star and Wanted were stamped with Versamark and embossed with Detail Black embossing powder. Piercing along the right side completes the card.

I hope to make up for lost time this last week or so with some of these challenges, so stay tuned for more creations! :-)

Seeing Pink Elephants?


I made this for the Dare To Get Dirty Challenges over on Splitcoast. I've actually had this idea (i.e. Pink Elephant with a Martini since I participated in one of Jami Sibleys new catalog swaps last year). I'm having to multi-task and combine challenges. This was created for both Cambria's and Cindy's challenges.

I had to resort to embossing on the acetate sheet as I didn't have any Pink Staz-On. You can't see it in the photo but the Pretty in Pink layer is stamped with Linen. Everything else is stamped on Shimmery White. The little elephants ear is popped up with a dimensional and there are pink rhinestones in the center of the little flowers. I tied a little martini pewter charm to the ribbon and on the inside of the card I have some martini shaped bling. Here's a view of the inside of the card.


7.25.2007

An update...

Hi Cyber friends and fellow stamper artists! The whole Nicholson household has been stricken by a bad case of the flu (even poor mom who still needs to take care of everyone). I've got a few cards to post and I've been tagged by a few others. It will have to wait a day or so until I have my energy back.

I will be doing the Acetate card tutorial in August for Splitcoast. This will be a small way that I can contribute to a site that has given me so much.

Linda

7.14.2007

Butterflies on Vellum

Julia Stainton made a beautiful card (but when does she NOT make a beautiful card) a little while back for her daughter in which she used SU's cardstock vellum as the card base. If you have never heard of Julia, you will be in for a treat for the eyes. Here's a link to her blog Belle Papier (translation Pretty Paper). Her blog is aptly named.

Julia advised that the VersaMagic Multi-surface Chalk Inks were made to stamp on vellum and dry quickly. I happen to own a few due to all the enabling that goes on over at Splitcoast, so I thought "Hey...instead of hoarding my stuff, maybe I should actually use it and give one of these vellum cards a whirl!" ;-) I'm glad I did . I also used for the very first time my Papertrey Ink Butterfly Kisses stamp set.

I stamped the butterflies with two different colors of chalk ink. Once dry, I overstamped the straight line image in Versamark and then embossed with detail white embossing powder. I cut the butterflies out and mounted on dimensionals on a Shimmery White panel that was embossed with the Cuttlebug Tiny Bubbles embossing folder.


Stamp sets used: Papertrey Ink Butterfly Kisses


Cardstock used: CS weight vellum, Shimmery White, Soft Sky


Ink used: Versamagic Aspen Mist, Pretty Petunia, Spring Pansy, Versamark


Accesories: Detail White EP, Cuttlebug, Tiny Bubbles embossing folder, dimensionals


7.13.2007

Acetate card

I've had a lot of requests for directions on how to make an acetate card. I'm going to attempt a tutorial on my blog in the next few days so you can have a visual of how these go together. :-)

Please bear with me as I've never done this before.

Linda

7.11.2007

Casing Ellen


One of my favorite enablers...um make that artists is running a contest on her blog. That artist (and enabler extradinaire) is none other than Ellen Hutson. The contest is to use one of her recent layouts and stamp a card with a Lockhart image. None of us know what the prize is, but Ellen promises that it will be good. :-)


I just adore this Roses and Daisies Lockhart stamp from the La Fleur Couture line. I think the La Fleur Couture and the Veggie Couture stamps are just a brilliant concept. Ellen has made some of the most beautiful and elegant cards that I have ever seen with these stamps. If you haven't ever checked out Ellen's blog, I would highly recommend paying her a visit.


I wish my photo did better justice to how shimmery this little beauty is. The cardstock is SU's Shimmery White. In addition to that, I used my Sakura glitter pens (pink and clear) to highlight portions of the dress. Alas, it is cloudy and overcast here in Colorado, and this is the best picture that I could produce.

Stamp set used: Roses and Daisies
(Lockhart)

Cardstock: Shimmery White, Very Vanilla
Ink: Timber Brown Staz-On, Certainly Celery, Pretty in
Pink

Accessories: Dots embossing template (SU), Scor-It,
Marvy Oval Scallop Punch, Celery Organdy, dimensionals, Sakura clear and pink
glitter pens

7.01.2007

And speaking of the birthday boy!


Here is my little birthday boy in all his blonde haired, blue eyed glory!

Doodle on Acetate

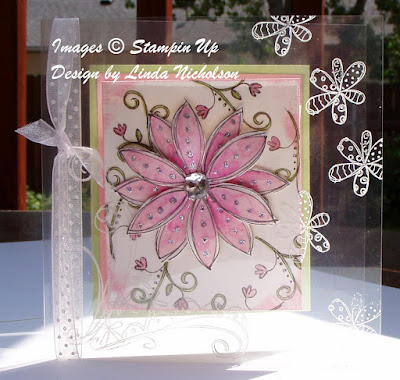
I have to say that I really like how this card turned out. I started out not really having a purpose for this card in mind, it was purely fun stamping (which is the best kind). When I was finished with it, I knew this card would have a special purpose (a much needed, long overdue Thank You).
The card base is a 5 1/4 inch square acetate card. I stamped the big flourish from Doodle This in the lower left corner (don't know how well you can see it in the photo, acetate cards are a bugger to photograph) with white Staz-On and then stamped the flower from Doodle that randomly along the right edge of the card. I stamped the large flower from Doodle This twice on Shimmery White CS and then watercolored using my watercolor crayons and an aquapainter. I then outlined the flowers with my Sakura glitter pen and then added Dazzling Diamonds to the dots on the flower. I cut out each flower and used a pencil to curl the petals of the top most flower. I mounted the flower with the curled petals on top of the other cut out flower and added a big Jewel in the center and set the piece aside. I then stamped the smaller flourishy flower from Doodle That on a piece of Shimmery White cardstock and colored in with Pretty in Pink and Certainly Celery markers. I highlighted the pink flowers with my glitter pen.

The trickiest thing about acetate cards is to attach everything without your adhesive showing. I first positioned and attached the cut out flower in the center of my card using glue lines. On the inside of the card (underneath the flower), I then added more glue lines and centered my stamped panel with the colored flowers underneath. On the backside of the card, I mounted a Pretty in Pink panel to a Certainly Celery panel and attached with Glue dots. On the inside of the card (back panel), I then attached a Shimmery White panel (cut the same size as the white panel that you see on the front of the card) and positioned it just so.
When the card is closed, all you see is the beautiful shimmery flower with the one stamped Shimmery White panel that appears to be matted with Pink and Celery. I may just need to make another one of these for myself to keep! :-)

C-man's Birthday Card


This is the card that I made for my youngest son for his 4th Birthday. I couldn't resist the Crab & Co borg over on SCS and I have to say I'm happy that I purchased this set. I can see myself and my boys having a lot of fun with it in the future.


I stamped all of the images in Timber Brown Staz-On on Shimmery White CS (I find this CS holds up to watercoloring quite well) and colored all of the critters with my watercolor crayons. The sand and the sky are colored with Twinkling H2O's. I love how shimmery these paints are and they are so easy to use. I then stamped a few random spots on the sand with my Itty Bitty Backgrounds set and then selectively highlighted a few spots with my glue pen and dazzling diamonds. I matted the entire panel with Basic Black and then Real Red. The entire panel is then mounted to a 5 1/4 inch square card made from Cool Caribbean. The '4' is from a Basic Grey self adhesive numbers set that I purchased. I colored the chipboard with my Craft Black pad.

 
site design by designer blogs